Set up Custom Domain Integration
Grow organic traffic & SEO by integrating your Zync show with your custom domain. Here are the steps to set this up!
By following the step-by-step instructions below, you'll be able to seamlessly connect the show and episode pages generated via Zync to live on your own domain. This not only ensures that your content retains a consistent brand identity but also provides all the benefits of SEO (Search Engine Optimization) for your show and episode pages, ultimately driving more organic traffic and exposure to your online presence. So, let's get started on the journey to improve your digital reach and make your content easily discoverable.
We'll walk you through the process of adding a A record for {your_show_name}.{your_domain}.com using Zync's Integration settings page.
Here are the step-by-step instructions:
Step 1: Set up your custom domain
- Open your web browser and go to https://app.zync.ai/workspace/integrations
- Log in to your Zync account if you haven't already.
- Navigate to the Integration settings page and you will find the Custom Domain Integration
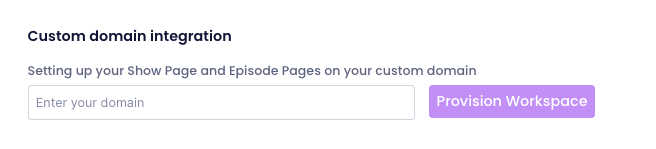
- Enter the subdomain you want the show to be hosted. Please be careful when you choose this as you won't be able to change this later. e.g. show.yourdomain.com or talkshow-name.yourdomain.com
- Once you enter this, hit "Provision Workspace". This will take some time for us to set this up.
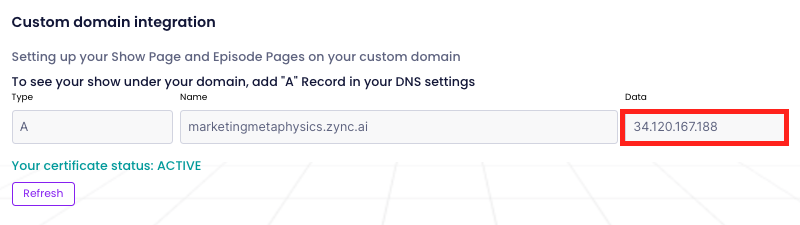
Step 2: Collect IP Address
- Once the Certificate is Active, you can copy the IP address available here
Step 3: Access Your DNS Control Panel
Log in to your domain registrar or hosting provider's control panel where you manage your DNS settings. The exact method for accessing your DNS control panel may vary depending on your provider.
Step 4: Locate the DNS Management Section
Within your control panel, look for a section related to DNS or DNS management. It may be labeled "DNS settings," "DNS management," "Domain settings," or something similar.
Step 5: Add a New A Record
- In the DNS management section, search for an option to add a new record. This is typically labeled as "Add Record," "Add DNS Record," or similar.
- Select "A" from the list of available record types. This will depend on your DNS provider, but A records are a standard option.
Step 6: Fill in the A Record Details
You will be prompted to enter the following information:
- Name/Host/Alias: Enter {your_show_name} or the subdomain you want to point to Zync's service. The exact format depends on your DNS provider, but it is typically a single label, not including the main domain.
- Data: Enter the URL you obtained from Zync's Integration settings page.
Step 7: Save the Changes
After entering the A record details, look for a "Save," "Submit," or "Update" button to save your changes. The specific wording may vary based on your DNS provider.
Step 8: Wait for DNS Propagation
DNS changes may take some time to propagate across the internet. This process can range from a few minutes to 48 hours, although it typically happens much faster. Be patient, and your subdomain will eventually point to the desired URL provided by Zync.
Congratulations! You've successfully set up your Custom Domain {your_show_name}.{your_domain}.com to your Zync Show Page. Let the SEO magic happen.
